Ever wanted to bring the natural beauty of geodes into your home as stunning, custom artwork? Epoxy geode art combines the intricate layers, sparkling crystals, and rich colors of real geodes with the creative freedom of resin art.
This art form has gained massive popularity, with searches for geode-inspired decor increasing by over 30% as more people embrace unique, nature-inspired pieces.
However, creating realistic geode effects with epoxy requires specific techniques and a careful approach to layering and texture. With the right guidance, though, anyone can learn how to make stunning geode art pieces with epoxy that elevate any space.
Whether you’re new to resin or an experienced artist, this step-by-step guide to creating epoxy geode art will walk you through techniques and tips for achieving realistic epoxy geode effects. Ready to bring the sparkle and shine of geodes to life? Read on for all you need to know!
What is Epoxy Geode Art?
Epoxy geode art is an art form that mimics the layered, crystalline beauty of natural geodes using a special geode epoxy resin, pigments, and textured elements.
Inspired by the vibrant colors and intricate structures of real geodes, this style of art incorporates layers of epoxy in various shades and finishes, often combined with crushed glass, glitter, or stones to resemble sparkling mineral formations.
Each layer is carefully poured, blended, and manipulated to create depth, which makes the artwork appear three-dimensional and lifelike.
At the core of geode resin art is the technique of layering different colors and textures, which builds a visual effect of natural crystal structures. Artists often use mica powders or metallic pigments for shimmer, adding an eye-catching reflective quality to the piece.
Epoxy geode art’s combination of rich colors, sparkling inclusions, and organic shapes makes it a captivating choice for anyone looking to bring a luxurious, natural touch to their home decor.
What Are the Essential Materials Required For Geode Art?
Creating epoxy geode art requires a range of materials that help mimic the look and sparkle of natural geodes while offering versatility and creativity. Here’s a list of essential supplies:
- Epoxy Resin – Choose a high-quality, clear resin that cures to a glossy finish. Resin is the core element, allowing you to build layers and create depth in your piece.
- Pigments and Dyes – Pigments, mica powders, and alcohol inks are used to add color and vibrancy. Metallic shades or glitters are popular for adding shimmer to geode resin art.
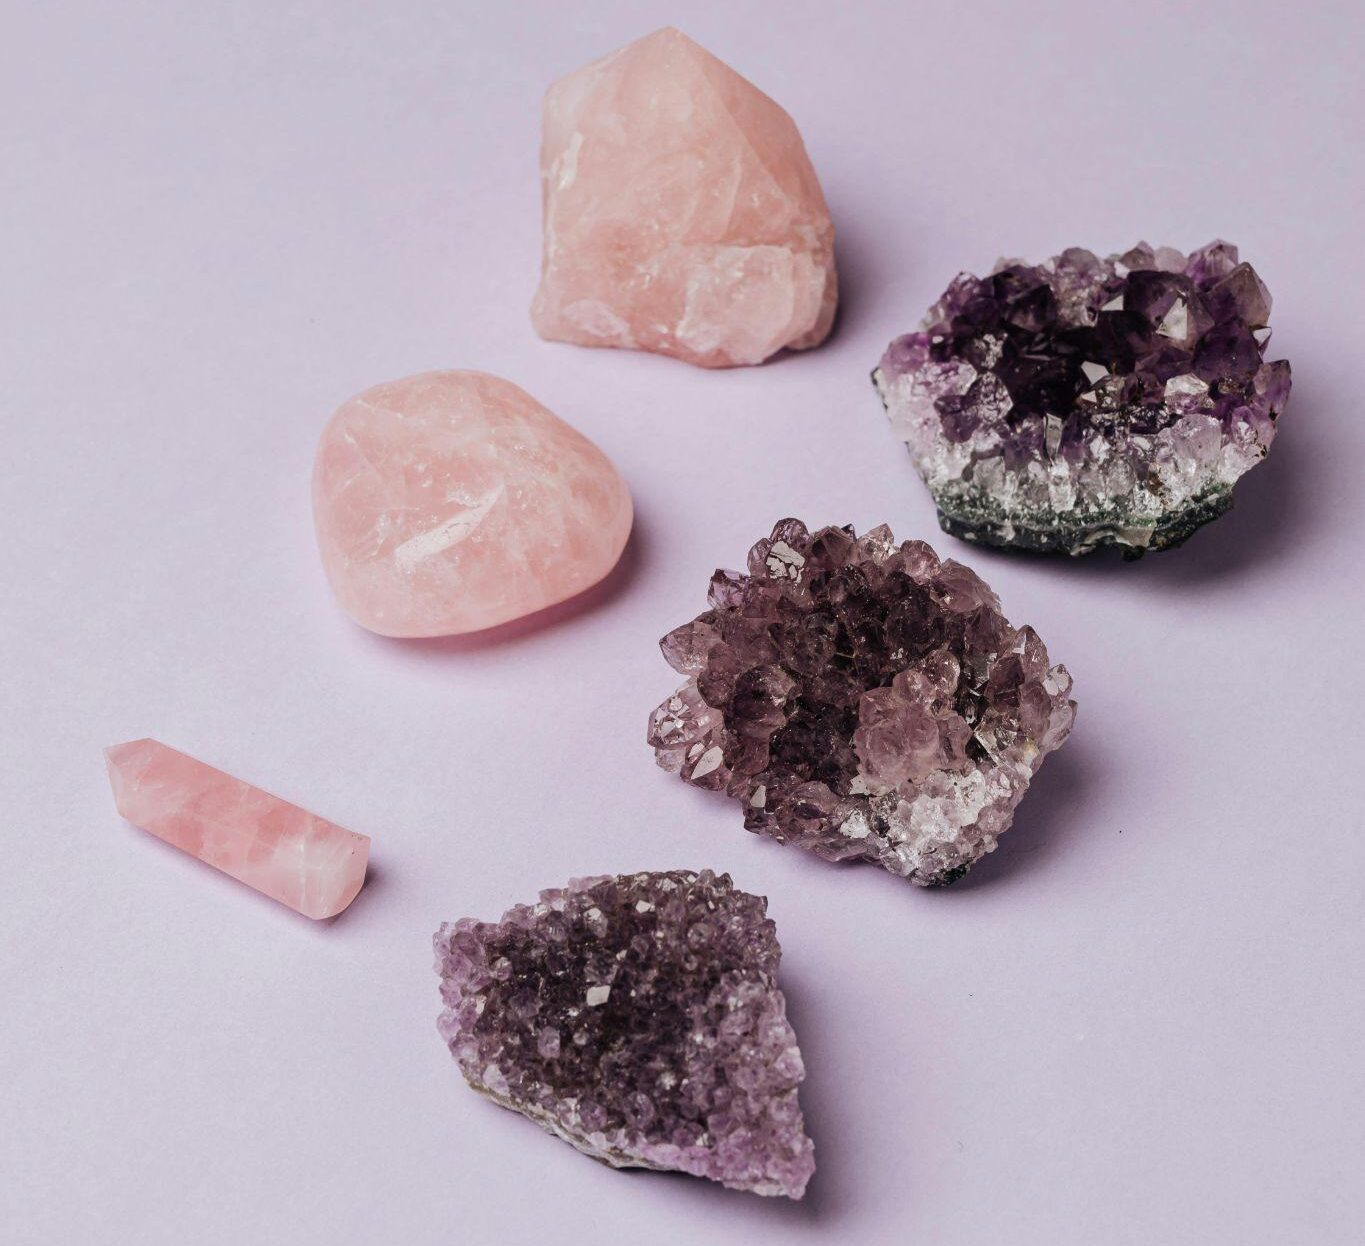
- Crushed Glass, Stones, or Crystals – These materials are key to creating realistic textures. Crushed glass, quartz crystals, and even glitter give an authentic, sparkling look.
- Mixing Supplies: Use separate mixing cups for each color and sturdy sticks to blend resin and pigments without contamination.
- Canvas or Wood Panel—Your resin geode tutorial will be based on a sturdy, flat surface like a wood panel or canvas.
- Heat Gun or Torch – Essential for removing bubbles and manipulating resin for smooth layering.
- Protective Gear – Gloves, a mask, and eye protection are necessary to avoid contact with resin and fumes.
These materials set the foundation for achieving realistic epoxy geode effects, helping you create textured, dimensional, and striking geode-inspired art.
How to Plan Your Design For Geode Epoxy Art?
Planning your epoxy geode art design is essential to creating a visually striking, cohesive piece. Start by envisioning the final look, from colors to textures, ensuring that each element contributes to the desired geode effect.
A well-thought-out plan guides each step, resulting in beautiful, layered artwork.
1) Color Selection
Choosing the right colors is key in geode resin art to evoke the natural beauty of geodes. Think about color schemes that reflect gemstone tones, such as amethyst purples, sapphire blues, or earthy browns. Metallics like gold, silver, or copper add a reflective shimmer that enhances realism and dimension.
Incorporating complementary colors, along with darker shades for depth and lighter hues for highlights, creates visual contrast. For added sparkle, consider including mica powders, glitter, or pearlescent pigments in accent areas.
This thoughtful approach to color selection in epoxy geode art allows you to craft a harmonious, realistic piece that mimics the layered, crystalized appearance of real geodes.
2) Shaping the Geode
Creating the right shape is essential for realistic epoxy geode art. Start by outlining an organic, uneven shape on your surface, such as a canvas or wood panel, to resemble natural geode contours. Avoid symmetrical or circular shapes, as real geodes have jagged and irregular edges.
Use painter’s tape along the border to control the flow of resin and contain the design within your chosen shape. For more realism, consider adding texture to the edges with modeling paste or layered resin.
Shaping your piece thoughtfully will help set the foundation for stunning geode art pieces with epoxy.
3) Layering the Layout
Layering your epoxy geode art creates the depth and dimension that define realistic geode effects. Start with a base layer of resin in your darkest color, forming the “core” of the geode.
Allow each layer to partially cure before adding the next, building outwards with lighter colors to mimic natural geode formations.
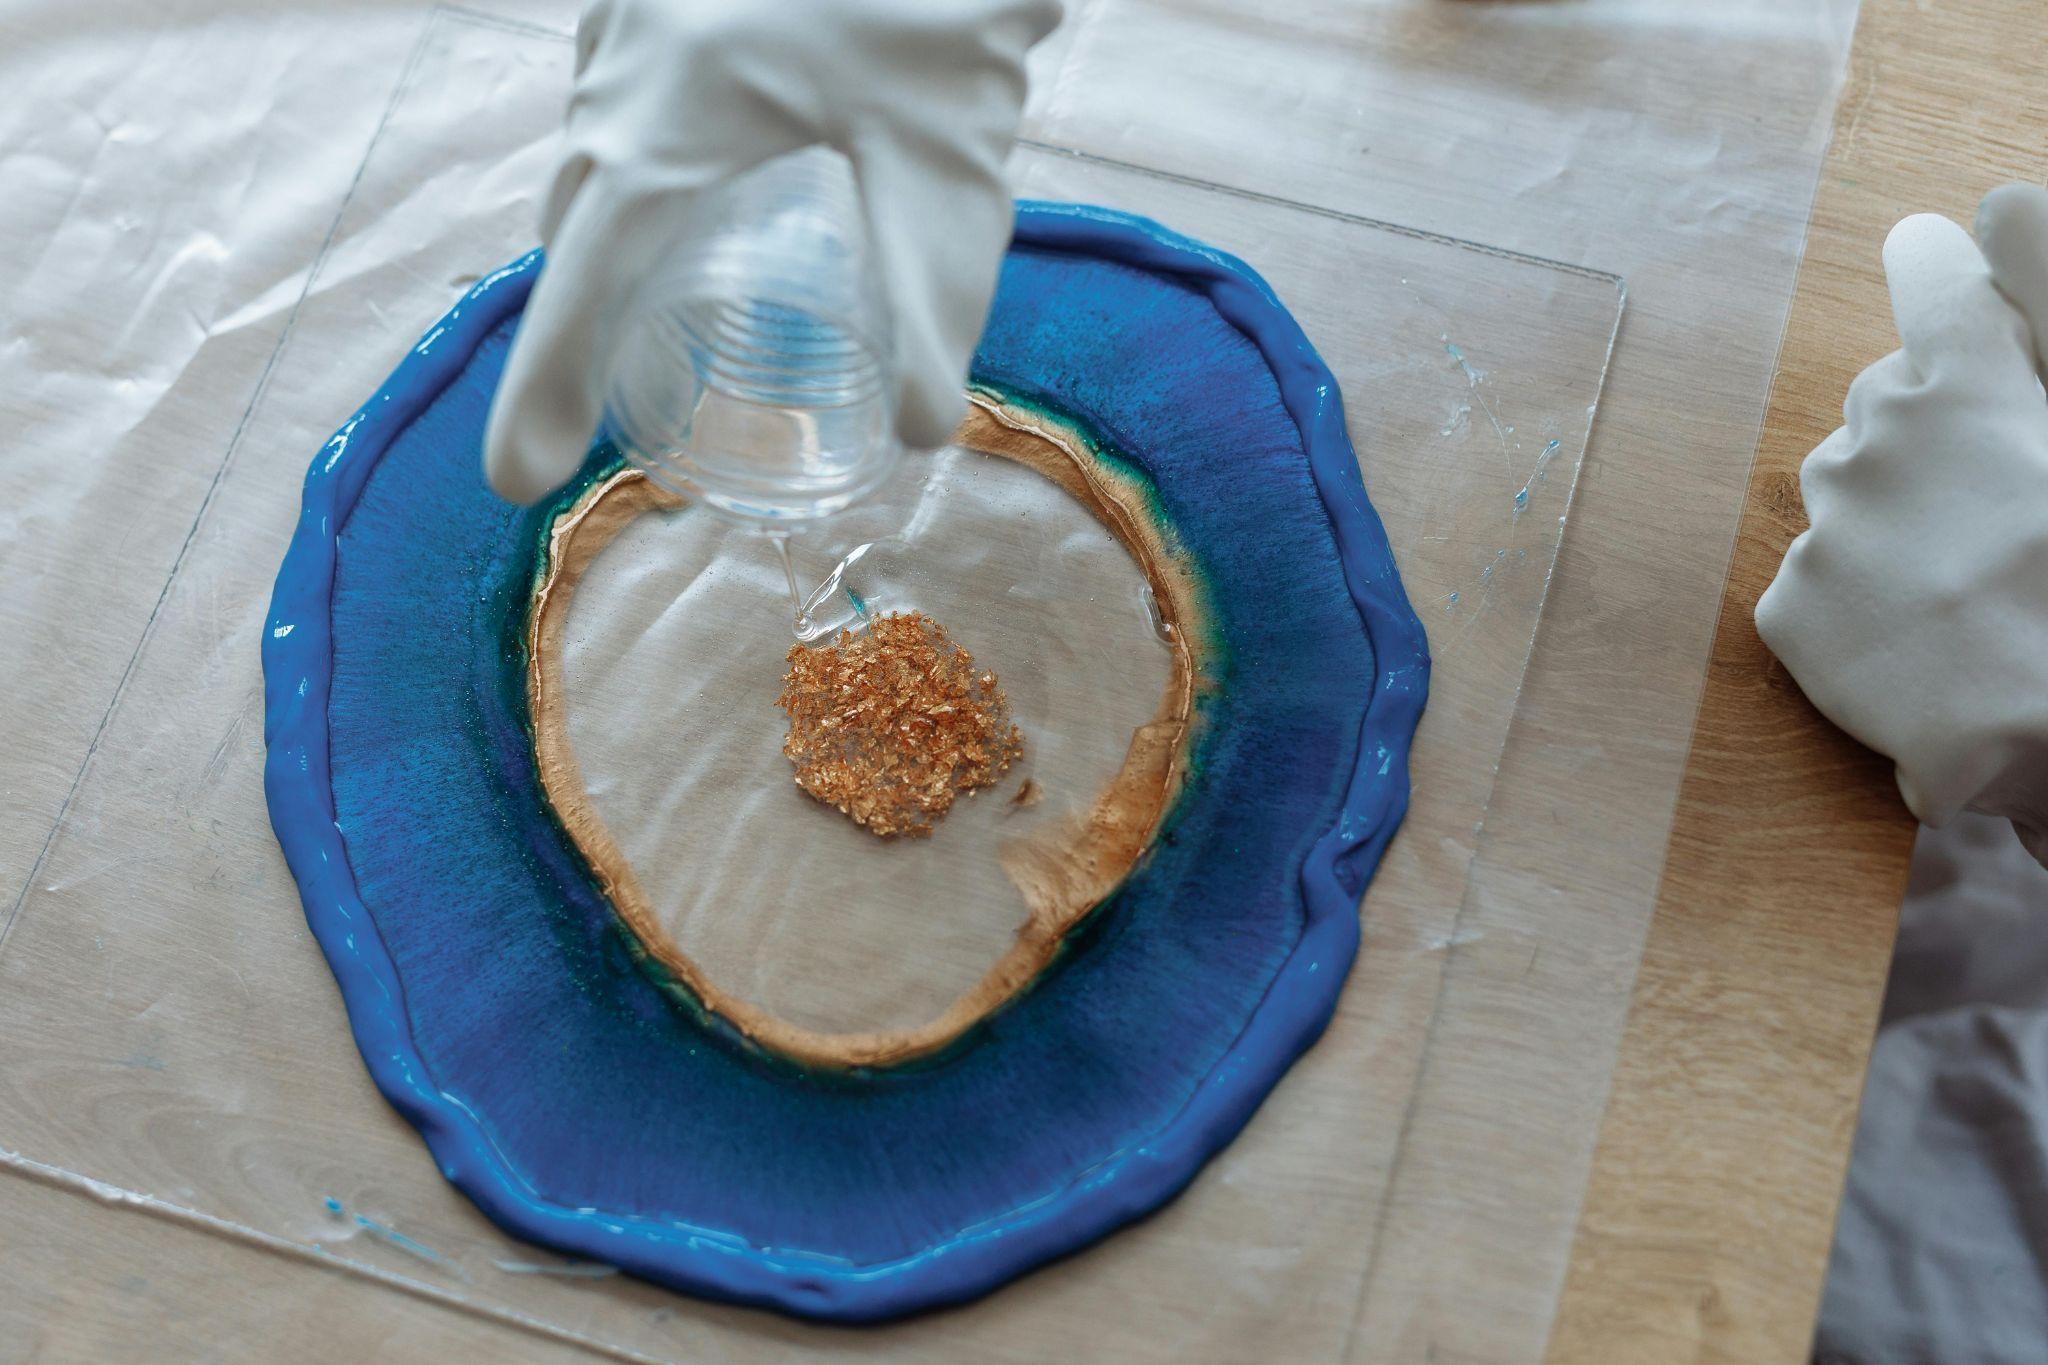
Use metallic pigments, glitter, or crushed glass for sparkle, applying these accents sparingly within specific layers.
This step-by-step guide to creating epoxy geode art ensures a realistic, multi-dimensional look in your resin geode tutorial, bringing out the intricate details of a real geode’s inner structure.
What are Some Techniques to Use For Geode Epoxy Art?
Enhancing epoxy geode art requires specific techniques to achieve a realistic, textured look. Popular methods include swirling, marbling, layering, and incorporating textures to mimic the intricate details of real geodes.
These techniques add depth, color movement, and shimmer, creating captivating geode resin art pieces.
1) Swirling and Marbling
Swirling and marbling techniques in epoxy geode art create fluid, natural transitions between colors, mimicking the layered appearance of real geodes. Begin by pouring different colored epoxy resins in sections, using complementary colors for a cohesive look.
To create a marbled effect, use a heat gun or a stick to gently swirl the colors, blending the edges without fully mixing them. Adding metallic pigments enhances the shimmer and depth, giving a luxurious, crystalline effect.
Swirling and marbling are essential in resin geode tutorials. They bring dynamic, organic patterns to the piece, making it visually similar to natural gemstones while adding a mesmerizing, fluid movement.
2) Layered Depth
Layering is a foundational technique in epoxy geode art for achieving depth and a three-dimensional effect. Start with a dark base color at the center, representing the “core” of the geode, and work outward with gradually lighter shades.
Each layer is poured and allowed to partially cure before adding the next, creating distinct lines and boundaries that mimic natural geode formations.
Incorporating metallic pigments or glitter in select layers adds visual intrigue, capturing light and enhancing depth.
This technique, covered in any detailed resin geode tutorial, builds a realistic, multi-dimensional appearance that makes the artwork stand out.
3) Metallic Edging
Metallic edging is a popular method in epoxy geode art to create a reflective, crystal-like effect along the geode’s “edges.” Use metallic pigments, mica powders, or even gold leaf in the outermost layers to frame your geode design.
Metallics add a rich, eye-catching shimmer that draws attention and gives the piece a luxurious, gem-like finish. Carefully apply the metallics along the boundary lines or edges with a brush or a small resin pour.
This technique is commonly used in geode resin art to highlight the edges, enhancing the artwork’s realism and giving it a polished, high-end look.
4) Crystal Clustering
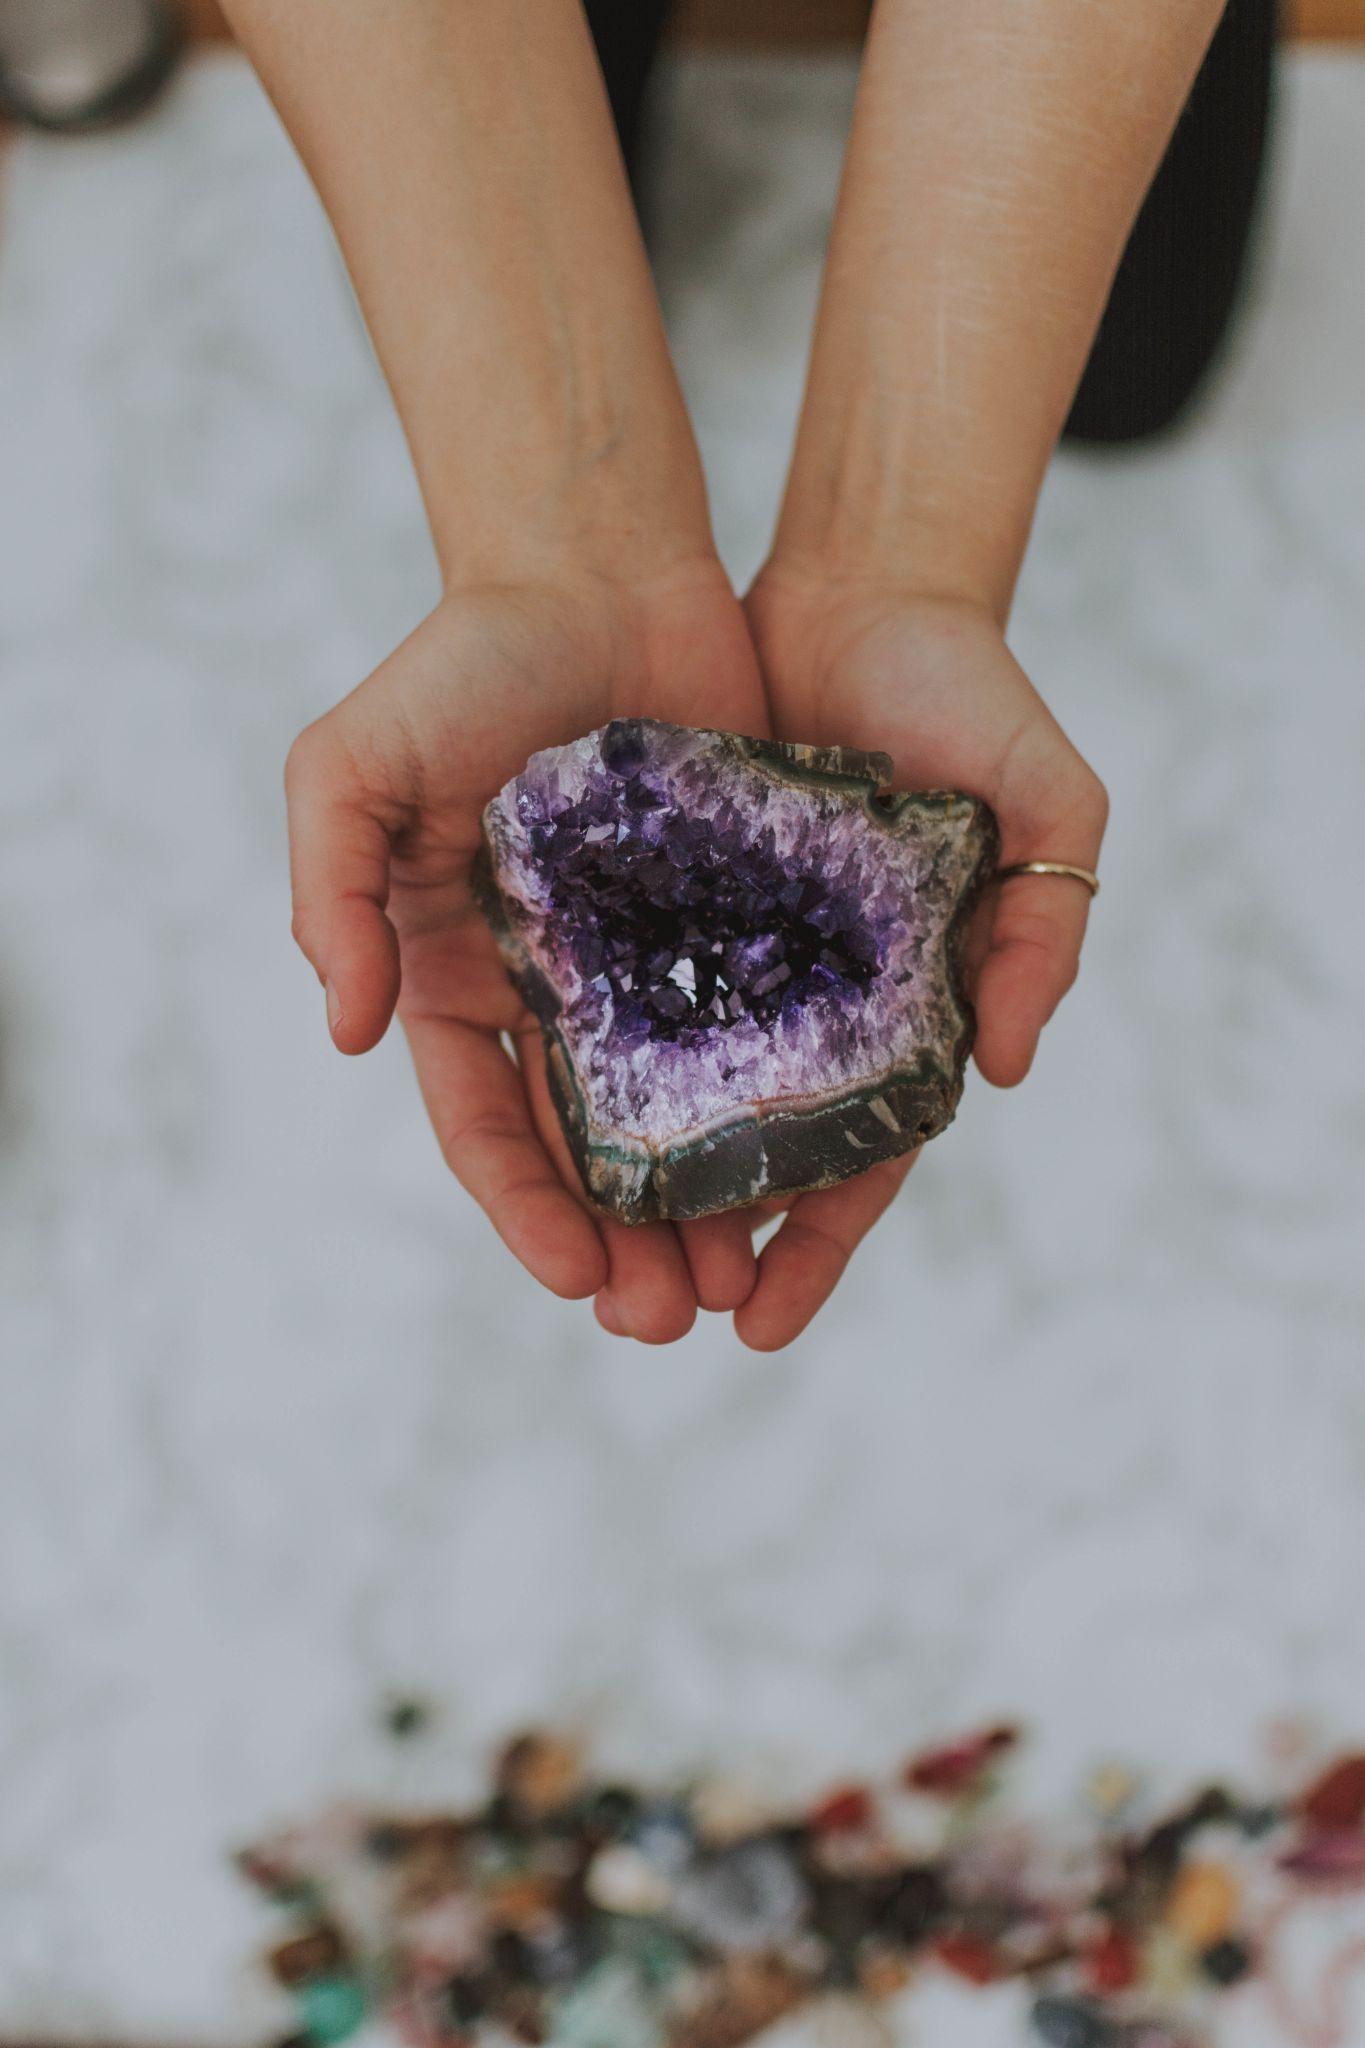
Crystal clustering is an advanced technique in epoxy geode art that adds texture and realism by embedding small crystals, crushed glass, or stones in the resin. Place these elements near the geode’s center or along select edges to mimic the crystalline core and formations of real geodes.
Arrange them in clusters for a natural look, allowing them to partially “sink” into the resin for a realistic, embedded effect. This technique adds a tactile, sparkling quality to geode resin art, creating visual depth and a multi-layered texture that elevates the piece, making it both lifelike and strikingly beautiful.
What Are the Best Ways to Display Your Epoxy Geode Art?
To effectively showcase epoxy geode art, consider thoughtful display options that emphasize its color, sparkle, and dimensional quality.
Ideal approaches include strategic mounting, lighting for enhanced shimmer, and proper care to maintain its pristine appearance. These methods make geode resin art a captivating focal point.
1) Mounting Options
Mounting epoxy geode art properly ensures it remains a stunning centerpiece. For wall-mounted pieces, use sturdy brackets or a hanging system that can support the weight of the resin. Float-mounting, where the artwork appears to hover off the wall, adds an elegant touch and depth.
If your geode resin art is on a wood panel, frame it with a minimalist border to keep the focus on the piece itself.
Alternatively, displaying it on a stand or easel can be an excellent choice for smaller pieces. This allows you to reposition the artwork easily and find the perfect angle to showcase its colors and textures.
2) Lighting Tips
Proper lighting enhances the sparkle and layered effects in epoxy geode art. Positioning your piece near natural light sources brings out its colors during the day, while adjustable, directed lighting, such as track or spotlights, highlights its metallic and crystalline features in the evening.
LED lights with soft, warm tones are particularly effective, as they add depth without casting harsh shadows.
To maximize the shimmer of embedded crystals or metallic pigments, consider backlighting or angled lighting that reflects off the resin’s glossy surface. This creates a dynamic visual experience that brings out the best in your geode resin art.
3) Care and Cleaning
Maintaining the beauty of your epoxy geode art requires regular, gentle cleaning to keep its glossy surface free of dust and smudges. Use a soft, lint-free cloth to wipe the resin surface, avoiding abrasive cleaners that could scratch the finish.
For stubborn spots, lightly dampen the cloth with water, but be cautious not to let water seep into any crevices. Positioning your geode resin art away from direct sunlight can help prevent yellowing or fading over time.
With proper care, your piece will retain its clarity, color vibrancy, and striking sparkle, ensuring it remains a beautiful addition to your decor.
How to Make a Good Geode Epoxy?
To create a stunning geode epoxy art piece, start by selecting a high-quality clear epoxy resin that cures a glossy finish. Begin with a step-by-step guide to creating epoxy geode art by mixing the resin slowly to minimize bubbles.
Plan your colors carefully, choosing shades that mimic natural geodes, such as deep blues, rich purples, and earthy tones. Pour a dark base layer first to represent the core of the geode, then layer progressively lighter colors outward for depth.
Use metallic pigments or glitter for a shimmering effect and add crushed glass or small stones along the edges for texture. Allow each layer to partially cure before adding the next to achieve clean lines and realistic separation.
By following these techniques for achieving realistic epoxy geode effects, you’ll create captivating geode resin art that enhances any space.
Parting Thoughts
Creating epoxy geode art is a rewarding way to express your creativity while adding stunning, unique epoxy decor to your home.
By following a step-by-step guide to creating epoxy geode art, you can master techniques like layering, color selection, and embedding materials to achieve realistic effects.
Remember to embrace the process, as each piece is a reflection of your artistic vision. Whether you’re crafting small pieces or large, eye-catching wall art, the beauty of geode resin art lies in its individuality.
With practice and experimentation, you’ll continue to develop your skills and create breathtaking artworks that sparkle and shine, capturing the essence of natural geodes.
Ready to perfect your craft? Find top-quality epoxy supplies and expert support at JBH Chemical Ventures!